Sunday, September 23, 2012

Happy Sunday

Hi Crafters!
Hope you all are enjoying your weekend.  The weather here is getting colder but we are supposed to get temps in the 70's the end of the week, Yay!  I don't know about you but, I much prefer warmer weather like in the 80's or above.  I know, I'm not your typical Midwesterner (I am actually a Floridian even though I have lived most of my life in the Midwest).  My husband is loving it, the Yank!

On with today's post.


I used the following companies products:

Stampin' Up! (card stock)
Prima (tags and paper)
Spotted Canary (pearls)
My Favorite Things (stamps & Die-namics)


I felt the need to get my fingers dirty with card.  I inked all the edges of card stock, tags, and paper.  I used a Die-namics die to make the 3 flowers.  I chose to ink the lace with my sponge dauber instead of putting it in a baggie with my refill ink.  This was much less messy and I could work with it right away.  Plus, I didn't want a really saturated color, just a soft tint.  That worked pretty well.  The flowers seemed a little heavy so I popped up the image with some foam tape to balance everything out.

I entered this card in the following challenges:


Thanks for stopping by!

Friday, September 21, 2012

Give Thanks

 Hello Crafters!
I have been busy crafting again while doing laundry.  I call it multi-tasking but I dont' think that's what hubby would call it. LOL!  Here's my post for today.
I'm beginning to get in the mood for the Fall colors.  I used Stampin' Up, Autumn Leaves, Sizzix, Spellbinders, Paper Shapers, Scor-Tape, Spotted Canary and, Offray products on this card.  I used some unknown scrap paper from my stash and some brown paper bag as well as some twine.

I will be entering this card in the following challenges:


There is still time to enter if you are interested.  Just click on the link and off you go.  Have a great weekend!

Thursday, September 20, 2012

Create Your Classroom Project Coming Soon!

Hello Crafters!
As you know, CYC has just released their first stamp set.  You can check it out here.  So, the first round DT's have created their projects and I will be next.  My stamps are on their way and I can't wait for them to get here.  It should be any day now.  Yay!  I've already started my project and will finish it up when my stamps arrive.  Be sure to check back soon!

In the meantime, because of the new release, I'm thinking about school related stuff and have this card I made while visiting my friend in Minnesota (Hi Pam!) this last July.  You heard about that visit for the Rubber Stamp Events show that we enjoyed so much.  I found it while looking for that card that was MIA (which I found btw - post coming soon). 
Please meet Pencil Pixie from Whimsie Doodles.  The buttons and card stock are from Stampin' Up!, the papers are from Simple Stories & Graphic 45 and, the burlap ribbon is from Maya Road.  Because this is a digi image I used a fixative after heat setting to insure the ink from printing would not smear.  I colored this little lady in with my STABILO CarbOthello chalks and water painter pen. I also used the Tim Holtz paper edger to fray the edges of the image. My favorite embelishment on this card is the burlap ribbon.  Doesn't it just shout FALL!  Love it!  Well, I hope your school year as gotten off to a great start!  See you soon.


Tuesday, September 18, 2012

CR84FN Challenge 2nd sample

Ok, I have to admit that this CR84FN63 Color Challenge is fun, I just can't stop!  This is a great color combo so I've included the inspiration photo for you again just in case you missed it yesterday.


I guess when you say denim I can't think if anything but country style.  That's exactly what I was going for with this project.  When I started putting this one together that country song came to mind about blue jeans and pearls.  Maybe that was my inner voice saying, "Go ahead, do it".  You have to listen to your inner voice, right?  Well, if it's your creative inner voice you do.  So, I listened and this is the result.  As much as I liked yesterdays card, I love this project even more.

The directions are pretty simple.  I used Lifestyle Crafts Nesting Stockings die (the largest one fits in my hand) and die cut 2 stockings from brown paper bag, crumpled it a couple of times and inked with Stampin' Up! Soft Suede ink pad.  The top cuffs (1-1/2 x 4) (crimp after cutting), heels and toes (freehand cut) are SU card stock Buckaroo Blue (can't believe I still have any of this left).
 

The lace ribbon was glued to the bottom of both cuff pieces using hot glue.  I used hot glue to glue the stocking together as well (leave opening at top) after I glued the cut heels and toes down (used white glue here).  I added the jute between the front and back cuff with hot glue then added the stars.  The stars (2 each) are from paper bag that I crumpled and inked the same as the stocking.  However, I did add some denim glimmer mist to make them more blue.  I used white glue to glue the stars together but added a little hot glue where the jute is attached.  Again, using hot glue I attached the pearls at the bottom of the front cuff only.  I felt like the cuff needed a little more something and when I get that feeling on a project I usually add ribbon, just like I did here.  Just for purposes of this picture, I added some tissue paper to the inside of the stocking so it would have some dimension.  I made this thinking I would use it as an ornament but, wouldn't this look cute as a package topper with a little candy cane or peppermint stick peeking out the top?  You might even be able to get a small package of hot cocoa in there.

I hope you enjoyed my project today!


Monday, September 17, 2012

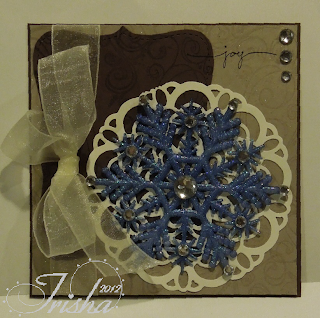
Joyful Denim Snowflake


Hi Crafters!
I stopped in over at CR84FN yesterday and found CR84FN63 Color Challenge that I just had to do. Here's the inspiration photo......


 Don't you just love the color combo?   Who doesn't like denim?  With such a great color palette I thought I would give it a try.  Here's my sample that I'll be entering into the challenge.


So, what are you waiting for?  Get over there and check it out!

I will also be entering this card in the Cute Card Thursday Challenge #234 which you can see here.


Sunday, September 16, 2012

Happy Owl-o-ween!

Corney, I know, but I couldn't resist the title on this post.  The project below just called for it.  Or should I say hooted (is that a word? - Wendy help me!).  Anyway, this little guy was so easy to make.  I used all Stampin' Up! products this time as he was a gift for my demonstrator.  She thought he was a hoot!  (Watch out I'm on a roll.)

These Stampin' Up! products were used on this project:
you can order these products from Susie Woods SU site here

Top Note Die (face)
Scallop Punch 1-3/4 (eyes) & 2-3/8 (wings)
Circle Punches: 1-1/4", 1", 3/4" (eyes)
Petite Pennants Builder Punch (beak)
Boho Blossom Punch (6 petal flower) (feet)
Blossom Petals XL Punch (feathers on head)
Apothecary Accents Framelits Die (largest) (body)
Fancy Fan Textured Impressions Embossing Folder (body)
Card Stock (Pumpkin, Chocolate, White, Black)
DSP: Patterns Stack Brights Collection
Sanding Blocks

The DSP was run through the big shot with the embossing folder before I die cut it.  By cutting afterwards I could cut the card stock for the back and the DSP for the front at the same time so they would match (no distortion).  I then sanded the embossing to bring out the impressions.  The note die is folded in half.  I hid the staple to hold the mini candy bar under the beak and glued the bottom closed with tombo mono-adhesive.  I also added a little white glue to make sure it stayed shut.  I used both types of glue on the wings and the feet as well.   If you like wiggly eyes (big ones!), those would be cute instead of the white and black punched circles. Whoo is going to give this a try?  I hope you do that's whoo!


Friday, September 14, 2012

Hello Daisy

Hello Crafters! Just a quick post today as I am beginning the apple butter today.  Hubby is home to make the stew so I don't have to do that (silent yay!).  He's better at that anyway.  I'm better with the apple butter.  Anyway, I made this card while I was playing around with some scraps and chose a layout from page maps (check my side bar - you will love this site).  Those of you who know me, know that doing simple cards isn't always easy for me.   I think I like this one though.  It's pretty and simple.  Pretty simple, huh? (pun intended)  Not sure of some of the products but the sentiment and the label punch are Stampin' Up and the flowers are from Prima.  That's it.  Have a great weekend!  P.S.  The apple crisp was great!

Thursday, September 13, 2012

Cut It Up Challenge


I submitted this card over at Cut It Up Challenge Blog.  The challenge is open until Sept. 19th.  I know it's a little out of season but since it has never been posted.....  Just follow the rules and play along.  I did!

Wednesday, September 12, 2012

Design Teams

Hello Crafters!

I have been asked to join another design team and I said "YES"!  You may have noticed the additional blinkie on the left side of my blog.  This new design team isn't up and running to the public yet but we are working furiously behind the scenes to bring you some great projects.  The design team members are all awesome paper crafters.  It is truely an honor to be part of this team.  You should start seeing posts for Eclectic Ellapu in about mid-October.  I'm so excited to be able to bring you new projects for both my teams.  Until that blog is ready, you can check out our host here.
Create Your Classroom should have their new release this week so stay tuned!  One of the team has already posted a sneak peak here if you would like to check it out.  I should be posting for them before the end of the month if all goes well.

In the meantime, I have been catching up on some older projects that I will be posting in a day or so.  I have a picture that is MIA so I have to find the card and take another picture before posting for you.

I have also been processing apples from my sisters trees so I can make APPLE BUTTER (YUM!) this weekend.  Hubby says I have appletendonitis as my hands, arms , neck, and back hurt from processing about a bushel of apples - all by hand!   Promised hubby I would make him some apple crisp tonight for helping me.  I will have pics and some recipe (links?) next week to share with you and maybe a little mini-book with all the yummy recipes.

Enjoy the rest of your week!

Saturday, September 1, 2012

SYS Saturday & A Comparison


Hello Everyone!  If you've been following me for any length of time now you know that once in a while (a bit erractically) that I have a "Stir Your Stash" post.  Better known as SYS Saturday as that is when I post.  Below is the layout for you this time.  I pulled a card from a little while back to do this time because I wanted to bring your attention to something.  Here's the layout.


Now look at the two pictures below.  I will be the first to admit that my coloring and cutting techniques haven't always been that great (still need a little work sometimes).  Case in point.  Picture number one is before I "tuned" my techniques.  I have become so particular now in the way I cut images out because I want my projects to be the best that I can make them.  So, look at the differences in the two cards below.  I no longer have this card in my stash so I corrected any areas I didn't like using a photo program just so you could see how much better a card looks when it is cut and colored properly.  Click on the pics to get a larger view.

Notice the uneven cutting a coloring
Touched up as if cut and colored properly


 See how much better the second pictures looks?  I have discovered over time that there are ways to make your cut images look more even if you want to take the time.  I have listed them below for you.

  1.  Turn your images over after the initial cutting.  I find that looking at it from the backside without all the "noise" from the image allows me to see the imperfections in my trimming.  I like to use my tiny nippers to take care of any "pointy" areas and I am very careful not to trim too much.
  2. Do your trimming over a contrasting background.  It helps bring out the areas that need to be "tweeked".
  3. Try smoothing out the edges by sanding lightly until you are happy with it.   I found a set of emery style sanders in a kit that I just love.  You can find these at Michael's or Hobby Lobby or Archiver's if you live close enough to these stores.  If not, you can try Joann's they may carry it as well.
  4. You can also use your ink pads or daubers to sponge the edges in the same color as your outline.  Whether you use this technique or not will depend on the image you are using and whether you leave any white around the edges or not.  There are those who prefer a little white around their stamped images.  This really (as far as I am concerned) is a matter of preference and the image that is being trimmed out.
  5. Always have a pair of reading glasses in your craft kit.  Even you young ladies can benefit from this.  You can pick these up anywhere.  I even have a pair I got from the dollar store.  Make sure you look at some small print before buying them of course as everyone's peepers are different.
 I am still perfecting my coloring techniques so I don't have any real advice for you on that other than:
  1. PRACTICE, PRACTICE, PRACTICE! Every person has a certain way they like to color and a preferred medium which they like to use.  The best way to get better is to practice.
  2. All markers are not created equal.  You can definitely benefit from a class on Copics (alcohol based markers) or an art class that will teach about color and blending (or check out books from your local library like I did).   Quality is important, so keep that in mind.
  3. Buy quality pencils or watercolor pencils (Crayola is for kids).  I like the different sets that Dick Blick Art store offers.  If you prefer watercolor pencils you can invest in an aqua-painter or a blender pen.  They're not too expensive and they will also work with your ink pads.  If you can't afford a good set of pencils or markers right away at least get the aqua-painter and/or blender pen to use with your ink pads (Just push down on the lid then open and extract color from the lid).

There is a lot more that could be said on these subjects and I welcome any comments from all of you.  In the meantime, try the layout above and have a great week!