Monday, February 25, 2013

Artistic Inspirations Challenge #30 - Fancy Folds

Hello Crafters!
Artistic Inspirations has a new challenge on the block. This time it's all about the folds! I love putting extra folds in my projects and may come up with another post or two for you this week with this theme. But first, let me announce our sponsor:
QKR
Click on the image to go to their blog and store. They have some awfully cute images over there. I'm sure you won't be disappointed.
So, here's my card for this weeks challenge:


I have used "Shoe House". It kind of reminded me of the old lady who lived in the shoe story. She's obviously had to move because her family has out grown their home.
I started with a natural color card stock that was 5-1/2 by 11-1/2 and scored at 2-1/8" and 3-7/8" in from each side. That will leave a center section of 3-1/2". Fold the first sections to the right and left of the main panel backwards creating a mountain fold. Fold the outer sections forward to create valley folds. This will leave you with a small area peaking out from behind your main panel. Mark lightly with a pencil at 3" from the bottom on each outside panel. Put the card stock in your trimmer and trim from the top of the mountain fold to your pencil mark on the outer panel and discard the trimmed off piece. Repeat for other side. Other cards that I have seen folded like this one have the folded panels completely hidden behind the main panel and I didn't want that. So, to the drawing board I went and came up with this. I think it helps the recipient to know there is more to come. When you pull on those small panels you get this:


I pulled some designer paper from Simple Stories 8x8 paper pack (school themed) and layered that on black card stock to make it pop. A small strip of black card stock 1/4" wide on the bottom of each panel adds a little interest.  Then I added a doily (trimmed) and a sentiment flag. I added the Shoe House image (popped up on foam tape) after coloring with my colored pencils and cutting out.  I chose buttons from my button stash (I tied crochet thread in each of the buttons) and a piece of Tim Holtz hardware and placed randomly on the main panel.  These were all stuck down with glue dots. The side panels seemed a little bare so I punched a couple of country hearts (McGill - I think) from the same card stock as the base of the card and attached to the outer panels. Now, if you want you can decorate the back side but I was thinking that for this card a photo of your new home would be appropriate for the middle section. Add your new address and phone # on one of the side panels and you still have enough room for a little note.
I hope you like my project today and that you'll give it a try.

Happy Crafting!

I entered into these challenges:


Sunday, February 24, 2013

Eclectic Ellapu Challenge #18 - Masculine

Hello Crafters!
Yep, it's a new week and a new challenge over at Eclectic Ellapu! this week our lovely hostess Claire - from the Pink Team - has asked us to make masculine cards. Great idea, we all need a few of those right? For my inspiration card I made a 4 x 4 card, otherwise known as a "Fat Page". I really enjoy making this size card. It can be a card or it can be a large gift tag if you want.
I stamped my image with Momento Tuxedo Black ink then colored in with my Spectrum markers. I have to say, I am loving the learning process in my coloring technique. After I colored the image in, I trimmed the piece and used my SU ticket corner punch. Then using my sponge dauber and SU Early Espresso ink I inked not only the edges of my image piece, but I went inward and left a "halo" of white around my image. I have not done that before but thought it was interesting. I popped the piece up with foam tape onto SU  More Mustard card stock and added gray mini brads on the corners. I cut a triangle of designer paper and layered that under the assembled image. I felt like it needed a bit more so I tried to attach some jute string tied in a circle but it hid too much of the image. So, I used the jute string and framed the image piece instead. I glued the string down with score tape.  All my other edges were inked with SU Early Espresso ink.

So get on over to Eclectic Ellapu and check out the Pink Teams' inspirations for you this week. I know you will love them, they are so creative! I hope you will decide to play along too!


Saturday, February 23, 2013

Let it Snow????

Hello Crafters!
Okay, I have to know. Who the heck ordered all this snow? Maybe Punxsutawney Phil has lost his touch because 6" of white stuff is not what I had in mind for an early spring. Perhaps, like the rest of us who are aging, he's beginning to loose his perfect vision.  Maybe it's not his eyesight that's failing, maybe it's his "all seeing eye" that's beginning to fade. Either way, it might me time for retirement. We all have to at some point, maybe, just maybe, it's his time. Just saying...

So, in honor of the beautiful white carpet we are now adorning on our lawn, I have a snowman card for my post today. This card was made by my friend Dena Shaull. We had a winter card exchange in January with our stamp club and this was her creation.
 Here is her supply list:
Circle Die-cuts = CTMH
Stamp = Stampendeous Jumbo Snowman
Scarf ribbon = Michael's
Smooch = orange for his nose
Detailed glitter embossing powder
Mosaic sticker tiles = Hobby Lobby

Directions:
Fold the card stock to the size you wish for it to be. Dena used 4-1/4".  Line up your folded edge just inside the cutting edge of your die-cut and cut. The result will be the bottom layer you see above (a circle with one flat edge - the folded edge). Next, layer another circle, slightly smaller than the first on top of the first layer with foam tape or dots. On a scrap piece of white card stock stamp and emboss the the jumbo snowman's face, hat, and twig arms then cut out. Attach the hat (I forgot to color mine) to the snowman head then layer with foam tape on top of the last circle creating dimension. I recommend doing this on top of your envelope to make sure you don't go past your envelope edges. Glue the twig arms down under the middle layer again, making sure not to go past the size of your envelope (you can always do this at a bit if an angle too because your card is longer from corner to corner) . Add the ribbon under the snowmans' head and tie. Use a glue dot to hold in place. Place the mosaic tiles on the bottom layer (card base) for buttons. Add your sentiment to the inside and you're done. 
Now, wasn't that easy? Too bad shoveling snow couldn't be done with as little effort! At least the kids got to enjoy one more snow day. I guess there's always a bright side but, my perception is a little skewed as I really dislike cold weather. I am originally a Floridian after all!
Happy crafting!


Monday, February 18, 2013

Artistic Inspirations Challenge #29 - Buttons & Bows

Hello Crafters!
Another challenge has begun at Artistic Inspirations. The theme this week is "Buttons & Bows" with our sponsor 

Sassy Studios Designs

Here's my card for the challenge:
I made this card for my sisters 50th birthday. I just fell in love with this image. She is definitely ready for a party or maybe she just had a hard day at work. Lol! My card stock is from SU, as usual. The circle paper is from DCWV, flowers are from Prima, scallop border is from Kaiser Craft, Ribbon is from Hobby Lobby and the sentiment stamp is from All Night Media. I love how the green buttons (from my stash) are the perfect color of the olives. That was a happy find. The light blue bow pulls the small bit of blue out of the circle paper so I tried to match her dress with them.
Well, I hope you will join us this week for our challenge "Buttons & Bows". It's sure to be fun. We have a new blog address due to some technical difficulties so be sure to click on the links I  have here to get over there.

Have a great week!

I entered this challenge:
Sweet Pea Stampers - Use a Digi 2/8-3/7


Sunday, February 17, 2013

Eclectic Ellapu Challenge #17

Hello Crafters!
The Purple Team is on again at Eclectic Ellapu. Andria has chosen a photo inspiration for this weeks challenge and boy is it pretty. I just fell in love with these colors!
 
I chose a card I made for a wedding this last fall. I was waiting for the perfect challenge to use it. I would say this is it! Take a look:
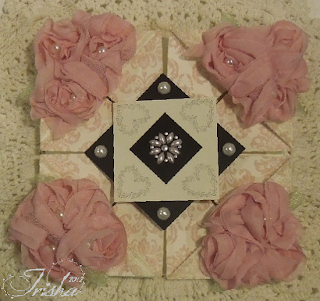
 I had so much fun making this card for my God-daughter Kate's wedding. My stamping friend Dena showed me the fold in a magazine and I knew I had to make it. It's not as complicated as it looks. The beautiful flocked damask paper is from My Minds Eye. You may remember I used it on the special birthday card that I made for my other God-daughter (Kate's sister) Kelly's 21st birthday a couple of weeks ago. The beautiful pink flowers are a strip of fabric/ribbon flowers from Prima that I cut down.  I used 3 flowers on each corner. The pearls are from my stash and the heart stamp is from a SU set. I'm not sure where the bling is from.
 The inside is actually the pretty side of the paper. I know that seems backwards but the corners on the front are folded back so you see the pretty side. I added vanilla card stock to the inside 4 corners so I could add Kate and her new husband Joel's names at the top along with the date at the bottom corners.  I added the embellished stamped piece after it was all folded together and attached it so it would line up with the inside image on the card but only attached on one corner so the card will open nicely.
The boy and girl were cut from a Cricut machine by my friend Leslie. Isn't it just the cutest? I alternated layers of vanilla and black card stock behind it to fill the large open space. Before giving the card away I added another piece of vanilla card stock (loose) with a sentiment and a few words from the heart for my God-daughter and her new husband.

Here's the folding pattern:
Here's how you make it:
You need to start with a 12x12 paper to end up with a 6x6 card. You could experiment with different sizes as long as you start with a square. So, if you want a 5x5 card, start with a 10x10 square. See where this is going? Start by scoring the paper along each side at 3" if you are using a 12x12. This particular measurement will be half of what you want your finished card to be. So, the 10x10 paper for your 5x5 card would be scored at 2.5 inches from each side. Unfold.

After doing that, you have to find the exact center of the paper and fold the corners in to the middle. I recommend doing a little pinch in the middle to find the center. You can do this by folding your card diagonally in both directions but only pinch the center. Don't worry, this will be covered up with your card stock insert.  Be sure to leave no gaps where the edges of the paper meet.

Leaving these folds in place, fold back each of the inner corners just so the tip meets with it's outer straight edge. Now, unfold the whole thing and crease all your folds well in both directions.  This is an important step as it makes the next step a lot easier. The folds should look just like my diagram above. Follow the valley/mountain fold notes on my pattern to prepare for the next step. See my unfolded photo above for a better understanding of where you should be at this point.

 Here's the tricky part. Push the center points on each side (not the corners) toward the middle. It works best if you do 2 adjacent sides at the same time. While doing this your corner square should also form. When all sides are folded in you will have a square with what looks like 4 smaller squares on top. It almost looks like the fortune tellers we all made as kids. The last step is to fold the inner tips of those smaller squares back to the outer corners allowing the pretty side of your paper to show. All that's left to do now is to layer your card stock where you like and embellish your card.

Tip: I don't recommend using light weight paper for the base unit of this project. However, if you do, make sure to adjust your measurements so you can put a card stock backing on your base. Keep in mind that this card will get a lot of handling. People love getting cards that fold or move.

 Now, I hope you will play along with us this week at Eclectic Ellapu. I'm sure you will be inspired by the DT's wonderful creations so get over there and check them out! Don't forget to stop by their blogs and leave a little love! Get inspired then stop back with your own creations and join in. I'm looking forward to seeing what you all come up with.
Happy crafting!

I entered these challenges:


Saturday, February 16, 2013

Eclectic Ellapu Challenge #16 - Girly

Hello Crafters!
The pink team was up this week challenging you to make "girly" creations. I'm a little late getting my project done but still wanted to post it. So here it is:
 I won this image in a challenge a couple of weeks ago or so from Dillybeans. I just fell in love with it and knew it would be great for this challenge. I colored with my Spectrum markers and layered on Taken With Teal card stock (SU). I added a small bit of paper from my stash (SU) on the left side and layered with white card stock. I added a strip of teal card stock for interest.
 The headband just screamed "bling me, bling me", so I did.
 This flower arrangement is made from a ribbon of flowers scrunched together with some pearls added to the centers. I love the shabby chic-ness (another new word for Mr. Webster)  of the these flowers.
I stamped the sentiment with teal ink (SU) and made a flag for the bottom of the card then added some bling. The whole thing is layered on Pink Pirouette card stock (SU) and sprayed with Champagne Shimmer Mist (SU). So, there you have it, my version of a "girly" card. Hope you like it.

Thanks for stopping by today. Be sure to stop by again tomorrow for a really fun card for the challenge this coming week. I've even made a pattern for you to show you the folds so you can do one too. You're going to love it!

I entered this challenge:
Sweet Pea Stampers-Use a Digi 2/8-3/7

Monday, February 11, 2013

Artistic Inspirations Challenge #28 - Anything Goes

Hello Crafters!
The challenge this week at Artistic Inspirations is "Anything Goes" and our sponsor is:

CDee Designs 

Here's my card:
I used SU card stock and Champagne Shimmer Mist, DCWV designer paper, ribbon form Hobby Lobby,Autumn Leaves Swirls (background) stamp with Versa-Mark ink, flowers and bling from my stash, and  a new handmade pin (I made myself) in the ribbon. The image is colored with Spectrum markers. I really enjoyed putting this card together. The image is so pretty. Looks like she's ready for the prom.
Now head on over to Artistic Inspirations and play along! We have more great prizes up for dibs!
Have a great week! 

I entered this challenge:
Sweet Pea Stampers-Use a Digi 2/8-3/7 


Wednesday, February 6, 2013

Calendar for the New Year

Hello Crafters!
I have a cute little project to show you today. I probably should have posted in January but alas, time does fly.
 So all I did here is make a step card and turned it into a tent card. The background paper and card stock are from SU. I added the new 2013 calendar (distressed with chocolate chip ink of course) with Score-tape.

The flowers are made from three different punches. The largest is from SU, the other two are EK. I used SU antique brads for centers. I distressed the flowers with chocolate chip ink and pierced the petals then crumpled them before putting them together. I used champagne colored organdy ribbon (old SU stash I think), punched the sentiment with a Nestabilities die and inked the edges.
As you can see, I used a separate piece of card stock to achieve the tent affect. I glued the steps closed to make my project a little sturdier. The nice thing about this project is next year, all I have to do is add the current calendar. Cool!

Well, I hope you liked my project today. Be sure to stop back again this week for another 3-D project I made recently. You're going to love it!

I entered in these challenges:


Monday, February 4, 2013

Artistic Inspirations Challenge #27 - 2nd post

Hello Crafters!
For my second post today I'm using the image called "Flowers for Mom" from Robyn's Fetish. She's just adorable! I had a lot of fun coloring this one. Pink and yellow are a great combo.
  I used Pink Passion & YoYo Yellow (SU) card stock for my card bases. I ran one side of the Pink Passion card stock through a floral embossing folder from SU and sponged on pink and green ink for the flowers and stems and edges of the card. I stamped the sentiment (SU) and punched out with a small oval punch (SU) and inked the edges. I added a white ribbon printed with pink flowers (Offray) but, I inked it with green ink before layering on the card and tucking the sentiment behind. The image is colored with Spectrum Markers on white card stock and popped up with foam tape on YoYo Yellow card stock after inking the edges. The flower is 3 layers with a little pink ink and black brad in the center attached with a glue dot. Lastly I added some bling dots to the embossed flowers on the background.
Thanks for stopping by today and don't forget to stop by Artistic Inspirations and join in the challenge.

Artistic Inspirations Challenge #27

Hello Crafters!
It's time again for a new challenge at Artistic Inspirations. Our this week sponsor is:

Robyn's Fetish

My first card today is an image called "Don't Rain On My Parade". I just love the cute little frog in this image. Robyn's Fetish has a lot more great images to see so plan on stopping by her blog and taking a peek.
Our theme is embossing this week which is a technique I love to use. I didn't have an embossing folder that I thought would work with this image so I used a brass stencil and stylus. I found a small flower petal that looked like a rain drop so I used that. Since card stock is too thick to use a light box I laid my Basic Gray card stock (SU) on a foam pad with the stencil (Lasting Impressions) on top using the smallest end of the stylus. Then cut it out in the shape of a rain cloud. Voila!
 
 I decided there needed to be a little more contrast with the Wild Wasabi card stock so I folded back the right edge of the card about and inch or so and glued it down. I punched a small flower and circle from So Saffron card stock (SU) to make the sun peeking out from behind the cloud (rain or shine!). After coloring my image with Spectrum Markers I trimmed around the umbrella (thanks for the inspiration Pam S.) and layered that onto Pumpkin Pie card stock (SU) and trimmed around it as well so more of the cloud would show. I cut and colored an extra umbrella top and popped that up with foam tape for dimension and used glue dots around the top edges to accentuate the umbrellas curves. Here's a close up.
As you can see here I used Crystal Lacquer on the umbrella to make it look wet. Below I cut out another set of the two smallest rocks and popped them up and added a little lacquer to them, the frogs eyes and a little on the ground as well.
Before attaching the image to the card, I made a flag with Basic Gray and So Saffron card stock and tucked it underneath. I hand printed the sentiment. I'm pretty happy with the way this card turned out even though there was another technique I wanted to use for water.  I'll just save it for another time. The Spring season isn't too far away according to Punxsutawney Phil thank goodness, I'm sure tired of the cold and snow!

Sunday, February 3, 2013

Eclectic Ellapu Challenge #15 - Special Anniversary

Hello Crafters!
The Purple Team is on again with a great challenge for you. This time 'round we are doing "Special Anniversaries". This was perfect for me since two of my sisters will be having special anniversaries this year. For once, I'll be ahead of the game. That is, unless I forget to put them in the mail, lol!
 I wanted to do something a little different so I looked through my stash for some background papers that I created a while back. This is a really easy technique and a great way to use up old chalks. You could even use sidewalk chalk although you might have to add more for a little more color as sidewalk chalks tend to be pretty pastel. Great for Easter though. So, here's my card.
Please, don't let the length of my post scare you away. This really is an easy technique - I can just be a little wordy at times (ya think???) You will want a 1/4 sheet of white card stock to start (this size handles well). You will also need a pan of cold water - about 1" will do. Don't use hot water as you do not want the chalk to dissolve too qucikly. Basically you scrape chalk on top of the water - you'll need a reasonable amount. You can use up to three colors, more than that will make the colors too muddy. At least 2/3 -3/4 of the surface of the water should be covered in chalk. Now, you can use glossy card stock for more vibrant colors or you can use regular card stock like I did here for a more flat finish. You can also choose to leave the chalk where it lies or move it around with a toothpick to add swirls. Don't over work the chalk though or a muddy background will be the result. The darker your chalk, the more sheets you will get out of it. Lay your sheet on top of the water - don't sink it. Make sure your edges touch the water. Remove quickly and set aside to dry. You should be able to get two sheets out of the lighter colors. You will also get more using the glossy card stock since the color doesn't soak in like it does with regular card stock. The sheets will get lighter as you use up the chalk laying on the water. Once you've gotten about all the color you can, add more chalk (I would recommend using the same colors if you don't empty the pan) and repeat the process. The hardest part is waiting for it do dry. It's better if you don't speed up this process. The card stock will curl a bit as it dries but you can, once it's dry, lay a heavy book on it for a day to flatten it out. This technique has been done on water mixed with clear gelatin and another similar technique is done with shaving creme and refill inks. I'm sure you will find lots of videos on YouTube if you do a search.
On my card above, I did not swirl the colors; I like the "splotchy" look. I took my new background paper and freehand cut a curved edge so the Basic Black card stock (SU) would show through at the bottom of the card. The paper doily is layered on top and wrapped around to the inside to add some interest. The scallop frame and flower were also from my stash. I think I got them at Scrapfest a couple of years ago. I stamped "Happy" (SU) on Basic Black card stock with white Color Box ink then went over it with a white gel pen and added the faux stitching around the edges. I punched a 2-1/2" circle (SU) from Basic Black card stock, layered under the pink frame and added "20th" with Color Box ink and the gel pen as before. I added black and clear bling dots to dress up the frame a bit and attached the flower with a glue dot. Last I added the "anniversary" with Color Box and white gel pen. I will add a 1/4 sheet of white card stock on the inside when the time comes to add a sentiment or write my own words.
Well, I hope you enjoyed my special technique to go with our special Anniversaries theme this week. Be sure you stop over and check out the rest of the Eclectic's DT inspirations, you will not be disappointed and I hope you will also want to play along.